

There are many different website building platforms and it is now possible to get a site online quite rapidly. This wasn’t the case at the end of the 1990’s or at the start of the 2000’s, when it was necessary to know some HTML and CSS. Building a site took many hours of work. It’s this legacy that causes people to think it’s still difficult to create a website.
Now, however, website builders like Wix, Weebly or Squarespace and the content management systems like WordPress, Joomla or Drupal have simplified the task. These platforms are user friendly and make it possible for people without any or very little knowledge of coding to create great looking websites, relatively easily.
In this article I will go through the process of building a website with WordPress. In the first part of the article I will explain procedure with a traditional hosting service and toward the end of the article I will show you my favorite way of creating a site with WordPress and for free.
Why choose WordPress?
Here are some of the main reasons I favour WordPress:
- it’s free – as open source software there are many programmers and individuals working to improve WordPress for the benefit of everyone
- easy to install
- large selection of themes both free and paid
- vast selection of plugins to add features and functionality to your site, many are free
- SEO – WordPress is easily optimized for the search engines
- easy to add and update pages and posts
- responsive – mobile friendly
The website builders are easy to use, but in general you are more limited in the choice of theme or template and they also have less in the way of functionality. They could be alright for a personal website.
The other CMS platforms are a little more complicated to use and may require some coding experience.
Now you have decided on the platform you will be using you can start building your site. Although before actually creating your site you will need two things, a domain name and hosting.
Domain name
For your domain name I recommend using namecheap.com, I have found them to be reliable and affordable. Nonetheless, there are many other alternatives online, each with their own advantages.
There are a few things to consider when choosing your domain name. It’s always preferable to know what your niche is before selecting your domain name.
If you have chosen your niche, you can include a relevant keyword in your domain name. Although, a keyword in the domain name carries less weight than in the past, I think it still might be slightly advantageous to include your keyword in the domain name.
When making your decision of domain name you should try to make sure it’s:
- memorable
- short
- easily spelled
- no hyphens
- either descriptive or brandable
- doesn’t include any trademark names which could cause legal problems
Next, you need to consider the TLD (top level domain) extension. If you can find a .com that should be your first choice if not .org or .net. Some say that .coms rank better, however I can’t say I have noticed any difference with my .net site.
Hosting
The price of web hosting can vary greatly. If you’re just starting your website, shared hosting which is the cheapest and most popular solution should suffice. This costs from anything from $5 to $10 per month.
The main disadvantages with shared hosting are you are limited in disk space (how much space you have for storing your entire site) and also limited in the bandwidth (the amount of data that can download from your site)
For starting a website, shared hosting will be fine, you might need to upgrade as your site grows and becomes more popular. There are many companies that offer WordPress hosting Bluehost.com, SiteGround.com or DreamHost.com to name just three. I would just make sure the company you choose has the 1-click installation for WordPress, this will save you some hassle later.
Installing WordPress.
Now you have your domain name and hosting you need to install WordPress. If you have selected a reliable, proven hosting company, they should have 1-click installation for WordPress. This makes things considerably easier and quicker. The video below goes through the process with Bluehost hosting.
It’s very simple:
- Go to your Cpanel
- Click on one-click installs
- Choose WordPress
- Click start button
- Select the domain name you have chosen
- Choose a site name, username and password
- Click the install now button
If you have chosen a hosting company that doesn’t give you the choice of 1-click installation you will have to do a manual installation see this guide.
Choosing a theme or template
Your WordPress installation comes with a default theme which will give a basic, simple design. One of the great things about WordPress is that you can change the design (theme) of your site very easily, to give your site an individual unique look.
There are thousands of professionally designed themes available both free or premium. When starting I would recommend choosing a free theme.
Remember a theme can be changed at any time in the future. Furthermore, when you change your theme you won’t lose any content or posts, they will be transferred automatically into your new theme.
How to find a theme
- You will need to log in to your WP dashboard (http://yoursite.com/wp-admin) and enter your username and password
- Once you’re in the dashboard, navigate to Apearance -> Themes
- On the Themes page, click on add new
![]()
- On the Add Themes page you have a choice of featured, popular, latest or a feature filter. Personally, I use the feature filter where you can filter by color, layout, features or subject. You should definitely look for themes that are responsive, but apart from that anything that suits your needs is fine. I checked the responsive box on the filter and I found there were 1098 themes. It’s worth taking a little time to find one you like. If later you decide it is not the ideal theme for you, it’s possible to change.
The only thing left to do now is install the theme. This is very simple, click the install button and then activate. Your new theme is installed.
Basic options to configure
Once your theme is installed there are a few basic settings that should be configured to make your site more agreeable for your visitors and more search engine friendly.
General Settings
Several of these settings are found under Settings -> General
Now you are on the settings page you should give your site a title and a tagline. For the title use a popular search term that searchers would use when looking for a site on your subject. The tagline is simply a slogan or phrase about your website subject. In both items try to include a keyword or two.
The next important task is to include your email address where you would like notifications sent regarding the administration of your site. Other items on this page are self explanatory for instance date format or time zone.
Permalinks
Another important point to consider are the permalinks, which are the permanent URLs to your blog posts, pages or categories. There are different permalink structures in WordPress.
The default structure is http://example.com/?p=N where N is the identification number of the post. This may work well in terms of the server finding your post, however, it doesn’t look very nice for your visitors and for SEO purposes it isn’t effective.
To change your permalink settings go to Settings -> Permalinks and select the setting you feel is best for your site. You should avoid the Default and Numeric choices. Personally I would use Post name or Custom Structure.
Allow comments on your posts
If you want to encourage some form of interaction with your readers you should allow comments. While there are a few pros and cons with this, the main concern is with the spammers. Fortunately, with WordPress there are plugins that can help with this problem. Another “con” is the question of time in replying to the comments.
Nevertheless, in general, it’s a good idea to allow comments, this can also be beneficial in the search results. Google will crawl the comments as well as the content on your site, quality comments can add to the value of your article. The search engines also like to see some form of engagement.
To allow comments go to Settings -> Discussion
Below you can see the different comment settings, make sure the allow comments box is ticked, you can specify any other settings you would like to turn on or off.
Add widgets to your sidebar
A widget is a small block that performs a specific function most commonly in the sidebar of your site. For example, if you would like to have your recent posts, recent comments or categories in the sidebar it’s a widget that provides this feature.
To add a widget, go to Appearance -> Widgets. To add a widget simply drag and drop your selection to where you want it to appear in the sidebar. The widgets available and the widget areas will depend on the theme you have installed
Installing plugins to get more functions in WordPress
Plugins are extensions that add functionality and features to your website. There are nearly 38,000 plugins both free and paid. To add plugins from the WordPress admin panel go to Plugins ->Add New. Enter some keywords that describe the plugin or the name in the search box and hit enter. Once you find the plugin you are looking for, click Install Now and then Activate Plugin.
When you’re starting your site I wouldn’t install many plugins. I would recommend installing
- Askimet to filter out the spam in your comments
- All in One Seo Pack, which helps you to optimize your site for the search engines
- SI CAPTCHA Anti-Spam – this adds a captcha to the comments form to stop automated spam
Adding pages and posts
Now your theme is installed you can start adding content.
Pages
You will probably need an About Me and a Contact page on your site, login in to your site dashboard. In the side bar of your dashboard go to Pages -> Add New.
After clicking you are taken to the page editor, this resembles a word processor such as Word or Open Office. Here you type in your text, add images or videos until your page is complete. Click publish and your page can be seen on your website.
Posts
Follow the same procedure as with Pages, but this time navigate to Posts ->Add New
This is the same editor as for the pages, you must enter your post title and your content. You will notice two tabs
- Visual – uses the editor to format your text and add images
- Text – for directly adding the HTML code
Again, once your post is finished you must click the publish button to make it live.
Now you have a website with some pages and posts, you want people to be able to find your content. Therefore, you will need to create a menu for your pages/posts and categories for your posts.
Creating your Menu
The ability to easily create menus is important, depending on your theme you may have one or two navigation bars. Having good menus is essential in helping visitors find the information they require on your site.
To set up your menu go to Appearence -> Menus. The first thing to do is name your menu and then click on the Create Menu button.
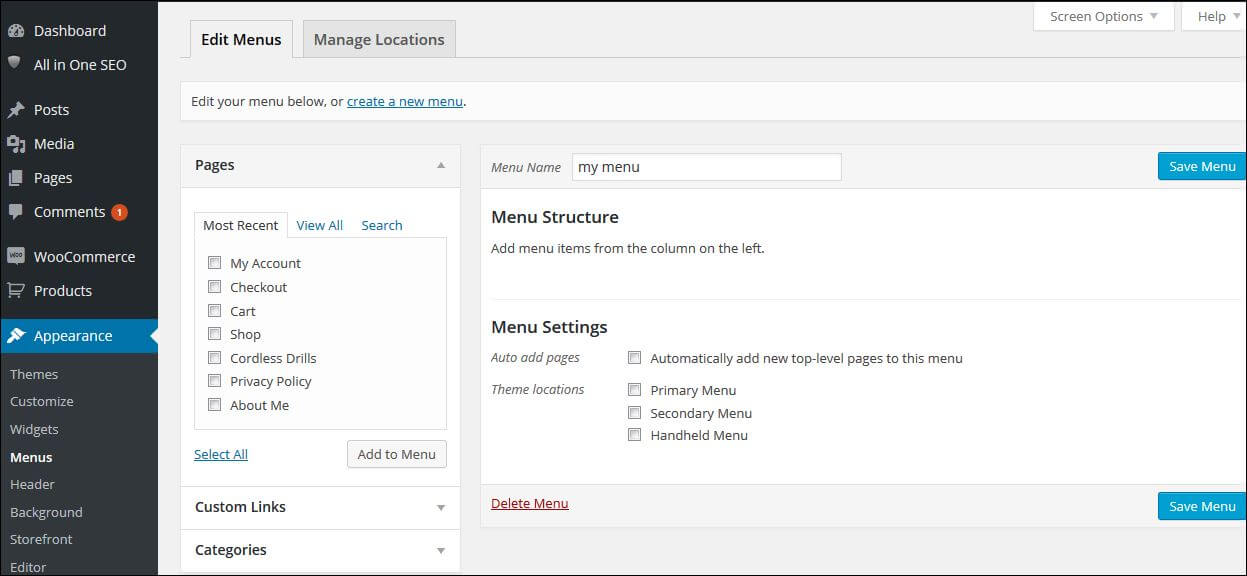
Now your menu is created, you have the option to:
- create a menu with all of the pages of your site
- add the pages you choose to your menu
- add links to your menu, you could use this to link to another site or to posts on your site
- add categories to your menu
For this example I created a menu with all the pages of the site.
To create the menu structure you desire, drag and drop the menu items where you need them. You can drag and drop the menu items as pages or sub-pages. To make a page a sub page in the menu, drag the menu item a little to the right and drop on the page you want. As you can see below I have changed the order and moved two items to sub pages. With WordPress it’s very easy to achieve the menu structure you require.
Creating Categories
Categories are a very useful way of organising your posts. A post can be in more than one category and it’s easy to set up parent and child categories. This gives a very adaptable system to show your posts where you want.
To create new categories, access Posts -> Categories.
On the left of the page you are able to add new categories. Fill in the category name, the slug which will be used in the URL of the category and press the Add New Category button.
As you can see below for this example I created a category named Drills and two sub or child categories of Battery and Mains.
Once you have the category structure in place you are able to add posts to the categories you desire. The easiest way to do this is when you write a post. The categories are on the right of the post editor just check the box of the category where you would like the post to appear.
There are many other tweaks and additions you can make to your WordPress site, the items I have explained are just the start. Having your site online with some content, menus and categories, will enable people to navigate your site and find the information you publish.
My choice for building a WordPress website
The platform I use for building a website is SiteRubix. It is a little simpler than the traditional hosting solution as you don’t have to install WordPress. It’s already installed!
There are four simple steps to creating your site.
This is so rapid it’s unbelievable, possible to do in under one minute. See this video where Kyle of Wealthy Affiliate, takes you through the process of building a site and actually creates a website in under 30 seconds.
You can try it for free, you will have a sub domain ending in siterubix.com (mysite.siterubix.com) In addition you will also receive some vital training on setting up your site and starting an online business.
If you are starting an internet marketing business you may wish to continue with the excellent step by step training. There is a cost of $47 per month, this includes hosting for up to 25 premium websites and 25 free websites, training, support and all the tools you need to create a succesful business.
Otherwise you are able to remain a free member for as long as you wish and keep your two free websites.
Your site is now online!
If you have followed the steps in this article, you can see that creating your own WordPress site is not too complicated and can be done quite rapidly. Consequently, nothing should now hold you back from starting your own site.
I hope you found this article very useful, but if you have any questions, remarks or would like to share your experience in setting up a WordPress site, please leave a comment below.
Thanks,
Peter
I’d like to share with you my not pretty good experience with Bluehost. I had been using Bluehost for a few years to host a few simple domains I own. You get what you pay for as their customer service is the worst I’ve run into. And you know what? There is NO phone number to call. How is that? And I can tell more and more but this review https://webhostinggeeks.com/providers/bluehost can do it much better than me. Seriously save your money and struggle and STAY AWAY FROM BLUEHOST.
Hi Sabrina,
Thanks for sharing your experience with Bluehost. Always good to get some feedback even if in this case it’s not good. The complaints about the customer service is worrying and I hope Bluehost work to put this right. I would always advise anyone searching for a web host to look at the latest reviews online to see if there are any complaints and then make their judgment.
Thanks again,
Peter
Hi Peter,
Wow, you got it all covered here. What a great tutorial on how to build a website with WordPress. I prefer WordPress over drag and drop site builders like you mentioned above, Wix, for example, because of the poor SEO and in some cases people aren’t even able to get their sites to rank.
I think for those that are serious about building sites, you really need to get educated on how to build a website first, then create low competition content and as you mention, allow and encourage comments, and for that matter, social shares on your site.
Which reminds me, I think I’ll go ahead and share this awesome tutorial on my social sites to help others who want to build their own website.
Great post as always, thanks,
Todd
Thanks Todd,
WordPress, for me, is definitely the best way to build a website. It’s true, I have seen some complaints about not managing to rank with Wix sites, but the drag and drop site builders are okay for personal blogs and they offer a free option, which is good. However, for a business site, receiving some training on getting traffic and setting up your site is a good idea. The best platform I have found for this is Wealthy Affiliate and their SiteRubix site builder. They teach you all about creating content with low competition keywords and everything else you need to know, from setting up your site to achieving sales.
Thanks for the social shares,
Peter
Hi Peter, wow what a great step by step article, I am too a member of Wealthy Affiliate and I absolutely love it! You sure didn’t leave anything out, on how to build a website with WordPress. Very easy to follow your directions, I personally like to use WordPress as there isn’t a lot of coding needed, and very easy to figure out. I use Wealthy Affiliate for all my hosting needs, I have tried others in the past and found the support is decent, but they really didn’t seem to take the time to help me understand the solution. With Wealthy Affiliate I’ve notice, a huge difference in the technical support, they are quick to respond and they stick with you until the problem is resolved helping you step by step. Thanks so much for taking the time to write such a detailed how-to guide, for those looking to get started with WordPress. Nicely done. I’ll check back again soon. Cheers. 🙂
Thanks Jennifer, I agree WordPress is a really great platform, easy to get started and to use. Learning to set up a site with WordPress, I found, just as easy as the other online editors. But, considering the additional functionality and choice of themes you have with WordPress, I think it is definitely the best option.
The hosting, site builder and training at Wealthy Affiliate are really first class. If you have a problem, the support is so rapid and helpful, I wish there were more companies like that.
Thanks for the comment,
Peter
What a great site with an awful lot of detail and good information that makes it really easy to understand how to put a website together. This a good training / information resource for anyone starting out or indeed anyone wanting to know about building a wordpress site. You cover this topic very well with good images and clarity of information in a logical order. You are correct in saying this is your favourite way to build a website because wordpress really does make it easy and the results are awesome and once you have put together your first one the second and subsequent sites are easier and easier. Anyone wanting to learn how to build a website would also be well advised to undertake the training available from your recommend Wealthy Affiliate Online education program as they definitely will show you how to build a successful, long term, sustainable online business. Thanks for sharing this information. Will bookmark for later reference, for sure..:)
Thanks Peter. Building a site these days is really quite easy with all the different site builders available online. When I think back to how long it took not so long ago to build a site using an “old” HTML editor, the difference is incredible. Of all the platforms I have tried, WordPress is definitely my favorite. As you say once you’re used to it the process just gets easier. It’s strange, when I read reviews for other site builders, they often say Wordpress is harder to get started, but in all honesty I found it quite easy. Perhaps this was due to the excellent training at Wealthy Affiliate, they really do make the process of setting up your site easy.
Thanks for your visit,
Peter
Great article about wordpress Peter! It does really contain a lot of useful info how to build a site, choose a domain name, a theme, some settings etc. It is very helpful not only to those who are just starting out but even to those who have some experience. It can save a considerable amount of time because you have all this info in one place and that’s really great. As for siterubix platform, I agree that it’s very easy to use and I have my free sites hosted there too. The platform is an excellent choice for anyone wanting to start online because it provides excellent support and quality training on internet marketing. I simply can’t add more to my comment and only can say that I recommend it to anyone looking for a legit opportunity to make money online and build a site using wordpress platform.
Thanks Rufat. Having built sites using HTML coding I really do appreciate how easy Wordpress makes it to build a site. I hope this post might encourage others to try Wordpress. It really is easy to get started, straightforward to use and very flexible.
SiteRubix makes the process of getting started even easier and the step by step training they provide in setting up your site is very useful. Then, if you decide you would like to create an online business you have all the training and support you could wish for. It’s the training and 24/7 support that sets SiteRubix apart from all the other website builders. To me, it’s simply the best site building platform!
Excellent tutorial about Wordpress and how it all works Peter.
Wordpress has truly been a revolution for people to be able to start there own online business and build a website.
They have taken all the technical headaches out of the equation, and now it is actually quite easy
With the tool you suggest, Siterubix, the process is even more simple… if you can click a mouse you can build a website!
Great post!
John
Thanks John. WordPress has really made making a website quite easy. The recent technological advances enabling you to install WordPress in 1-click or using SiteRubix which is even easier mean that nearly everyone can use WordPress. If you can create a document in a word processor, like Word, you can create pages and posts in WordPress.
The great advantage with SiteRubix, on top of making it ultra easy to make your site, is the training they provide. The training is from the Wealthy Affiliate University and teaches you everything you need to know about setting up an online business. It is this training that is missing from the other site builders or with traditional hosting.